Table of Contents
Silicone sealants and adhesives are ubiquitous heroes in construction, manufacturing, automotive, and countless DIY projects. Renowned for their exceptional flexibility, water resistance, temperature tolerance, and strong adhesion to a wide range of materials (glass, metal, ceramics, plastics), silicone creates durable seals and bonds. Whether you’re caulking a bathtub, assembling an aquarium, installing windows, or crafting molds, understanding how long for silicone to dry is absolutely critical. Applying stress or exposing uncured silicone to moisture can lead to adhesion failure, leaks, and compromised performance, turning a simple task into a frustrating redo. This guide delves deep into the factors influencing drying and curing times, providing clear guidelines and best practices.
Understanding Silicone and Its Uses
Silicone, distinct from organic polymers like latex or acrylic, is a synthetic rubber based on silicon-oxygen chains. This unique chemistry grants it remarkable properties: it remains flexible across extreme temperatures (from freezing cold to oven heat), repels water effectively, resists UV degradation and many chemicals, and exhibits excellent electrical insulation. These qualities make it indispensable for sealing windows and doors, waterproofing bathrooms and kitchens, bonding glass and metal in aquariums and automotive applications, creating flexible molds, and sealing gaskets in appliances. Given its diverse applications, knowing precisely how long for silicone to dry under your specific conditions is paramount for project success and longevity.
Factors Affecting Silicone Drying Time
Unlike simple water evaporation, silicone curing is a chemical process (often condensation cure) where the sealant reacts with atmospheric moisture. Several key factors dramatically influence the rate of this reaction:
Temperature and Humidity
Environmental conditions are the most significant external factors. Higher temperatures accelerate the curing reaction, meaning silicone dries and cures faster. Conversely, lower temperatures significantly slow the process down. Humidity is equally crucial; atmospheric moisture (water vapor) is the catalyst for the cure. Low humidity levels (<40% RH) drastically prolong drying and curing times, while high humidity (>60% RH) generally speeds it up. However, excessively high humidity on cold surfaces can sometimes lead to condensation, hindering adhesion. The optimal conditions for most silicones are temperatures between 40°F (5°C) and 100°F (38°C) and humidity levels around 50-60%. Using heaters, dehumidifiers, or simply waiting for favorable weather can help manage this.
Type of Silicone
Not all silicones are created equal. The most common distinction is based on their cure chemistry:
- Acetoxy Cure (Acetic Cure): Often smells like vinegar during application. This is the most common type found in hardware stores for general purpose sealing (kitchens, bathrooms). It typically skins over fastest (often within 30 minutes) and cures relatively quickly (often within 24 hours).
- Neutral Cure (e.g., Oxime, Alkoxy, Amine): These have a milder odor or are odorless. They are often used on sensitive materials (like metals that can corrode with acetoxy fumes), plastics, and stone. They generally take longer to skin over and cure fully compared to acetoxy types. Specialty formulations, like high-temperature RTV silicones or extremely fast-curing versions, will have drying/curing profiles specified by the manufacturer.
Application Thickness
This is a critical factor often overlooked. Silicone cures from the surface inward as moisture penetrates. A thin bead (e.g., 1/8 inch or 3mm) will naturally cure much faster than a thick application or deep fillet. Doubling the thickness can more than quadruple the cure time required in the center. For optimal performance and faster curing, apply silicone in a bead size recommended by the manufacturer for your specific joint – usually no larger than necessary to fill the gap and achieve adequate adhesion. Avoid over-applying or “piling it on,” as this significantly extends how long for silicone to dry completely through its depth.
How Long for Silicone to Dry: General Guidelines
While manufacturer instructions on the specific product tube are always the definitive source, here are general timelines under ideal conditions (approx. 70°F / 21°C and 50% RH):
- Skin-Over Time (Tack-Free): The surface forms a skin and loses its tackiness. This usually occurs within 30 minutes to 2 hours for acetoxy silicones and 1 to 4 hours for neutral cure silicones. At this stage, it may look dry, but it’s far from cured internally.
- Initial Cure / Handling Time: The sealant is firm enough to handle gently without distorting the bead. Expect this around 3 to 12 hours for acetoxy and 6 to 24 hours for neutral cure.
- Full Cure Time: This is when the silicone has completely reacted throughout its entire thickness, achieving its maximum physical properties (strength, flexibility, adhesion, chemical resistance). For a typical 1/4 inch (6mm) bead:
- Acetoxy Cure: 24 hours is often sufficient.
- Neutral Cure: Commonly requires 24 to 48 hours, sometimes up to 72 hours depending on the specific chemistry and conditions.
| Silicone Type | Skin-Over Time | Handling Time | Full Cure Time |
|---|---|---|---|
| Acetoxy Cure | 30 min – 2 hours | 3 – 12 hours | ~24 hours |
| Neutral Cure | 1 – 4 hours | 6 – 24 hours | 24 – 72 hours |
| Fast-Cure | 15 – 30 min | 1 – 3 hours | 6 – 12 hours |
Remember, these are estimates. Cold temperatures, low humidity, thick applications, or confined spaces with poor air circulation can easily double or triple these times. Always consult the product datasheet for precise information regarding how long for silicone to dry and cure for your specific application.
Best Practices for Silicone Application
Achieving a strong, durable seal hinges on proper technique before, during, and after application.
Preparation and Application Techniques
- Surface Prep is Paramount: Surfaces must be clean, dry, and free of dust, grease, oil, wax, and old sealant residue. Use appropriate cleaners (isopropyl alcohol, specialized silicone removers, acetone on tolerant surfaces) and allow to dry completely.
- Priming (If Recommended): Some difficult-to-bond surfaces (certain metals, plastics) may require a specific primer. Check the product instructions.
- Masking: Use painter’s tape to create clean lines and protect adjacent surfaces.
- Cut the Nozzle Correctly: Cut the nozzle at a 45-degree angle to a size slightly smaller than the joint width for optimal filling and tooling.
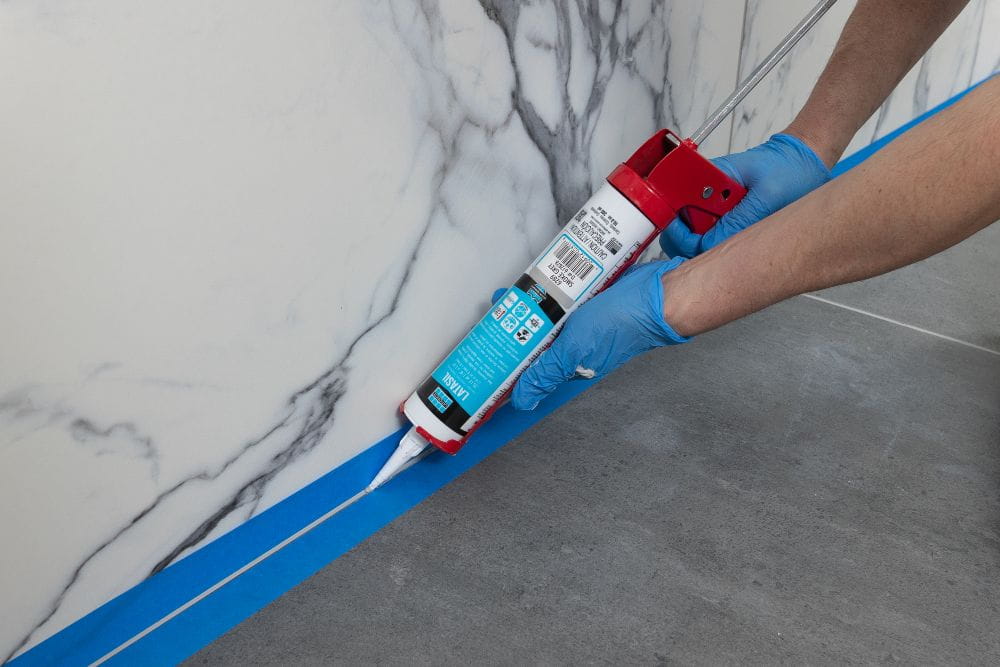
- Apply Smoothly: Hold the caulk gun steadily at a consistent angle, applying enough silicone to slightly overfill the joint without excessive buildup.
- Tooling: Immediately after application, use a wet finger (dipped in soapy water), a specialized silicone tool, or a plastic spoon/spatula (also wet) to smooth the bead, press it firmly into the joint, and create a concave profile that maximizes adhesion and flexibility. Remove masking tape carefully before the silicone skins over.
Curing vs. Drying: A Critical Distinction
This is a fundamental concept often misunderstood:
- Drying (Skin-Over): Refers to the initial stage where the surface loses its tackiness and forms a skin. The silicone looks dry.
- Curing: This is the complete chemical reaction where the silicone transforms from a paste-like state into its final rubbery form throughout its entire thickness. Full curing is essential for achieving the silicone’s advertised performance properties.
Never mistake a dry surface for a fully cured seal. Applying stress, exposing it to water, or subjecting it to temperature extremes before full cure can cause permanent damage, leaks, or adhesion failure. While the surface may be touch-dry in hours, the core takes significantly longer. Patience is key – always allow the full recommended cure time before putting the seal into service. Understanding this difference is crucial when planning how long for silicone to dry and cure for your project’s success.
Conclusion
Knowing how long for silicone to dry and, more importantly, cure fully is essential for the success and durability of any project. As we’ve explored, drying and curing times are not fixed but are significantly influenced by environmental factors (temperature and humidity), the specific type of silicone used (acetoxy vs. neutral cure), and critically, the thickness of the application. While general guidelines suggest skin-over times of 30 minutes to 4 hours and full cure times ranging from 24 to 72 hours, these are highly dependent on achieving near-ideal conditions. Always prioritize meticulous surface preparation and proper application technique to ensure optimal adhesion. Most importantly, remember that a dry surface does not equal a cured seal. Rushing the process by exposing uncured silicone to stress, moisture, or temperature extremes will compromise its performance and longevity. For the best results, consistently refer to the manufacturer’s instructions on the product tube or technical datasheet and allow the full recommended cure time before considering the job complete. By respecting the chemistry and timelines involved, you ensure your silicone seals and bonds perform reliably for years to come.