Table of Contents
Silicone sealant is a ubiquitous material prized for its flexibility, water resistance, and adhesive properties. Found in bathrooms, kitchens, windows, and countless other applications, it creates durable seals that withstand moisture and temperature fluctuations. However, its very resilience becomes a challenge when removal is necessary. Whether due to deterioration, a botched application, aesthetic reasons, or the need for reapplication, knowing how to remove silicone effectively and safely is an essential skill. This guide provides detailed, professional methods and crucial tips to tackle this common task without damaging underlying surfaces.
Understanding Silicone and Its Uses
Before diving into removal techniques, understanding what you’re dealing with is crucial.
What is Silicone?
Silicone is a synthetic polymer composed primarily of silicon, oxygen, carbon, and hydrogen. Unlike organic rubbers, its backbone is made of silicon-oxygen bonds (Si-O), which are exceptionally stable and resistant to heat, UV light, ozone, and many chemicals. This structure gives silicone sealants their characteristic properties: extreme flexibility over a wide temperature range, excellent water and weather resistance, strong adhesion to many substrates, and long-term durability. Once cured (typically through reaction with atmospheric moisture), it becomes a tough, rubber-like elastomer.
Common Applications of Silicone
Silicone sealant is the go-to choice for numerous sealing and bonding tasks:
- Bathrooms & Kitchens: Sealing around bathtubs, showers, sinks, countertops, and backsplashes to prevent water ingress.
- Windows & Doors: Creating weatherproof seals on exterior and interior frames.
- Automotive: Gasketing, sealing lights, and various engine compartment applications.
- Aquariums & Plumbing: Safe for potable water and creating watertight seals in fish tanks.
- HVAC & Industrial: Sealing ducts, electrical enclosures, and machinery where temperature resistance is key.
- General Household: Sealing gaps, bonding non-porous materials like glass or metal.
Why Remove Silicone?
Despite its benefits, situations frequently arise where silicone removal is necessary.
Reasons for Removal
- Deterioration: Over time (often 10-20 years), silicone can become discolored (yellowing or mold-stained), brittle, cracked, or lose adhesion, compromising the seal.
- Failed Seal: If the seal leaks or allows moisture behind it, causing damage like rot or mold, removal and reapplication are critical.
- Poor Application: Messy, uneven, or excess silicone looks unprofessional and needs correction.
- Replacement: Upgrading fixtures, countertops, or surfaces often requires removing the old sealant.
- Changing Sealant Type: Switching to a different type of sealant (e.g., switching from silicone to polyurethane for paintability) necessitates complete removal of the old silicone, as most sealants don’t adhere well to it.
- Aesthetic Reasons: Simply wanting a cleaner look or a different color.
When to Consider Removal
Don’t wait for complete failure. Consider removal if you observe:
- Visible cracks, gaps, or sections lifting away from the surface.
- Significant mold or mildew growth within the sealant that cleaning won’t resolve.
- Discoloration that detracts from the appearance.
- Planning a renovation or surface replacement where the old sealant is in the way.
- Preparing a surface for a new application of any sealant – proper adhesion requires a clean, silicone-free substrate.
Methods for Removing Silicone
Successfully removing cured silicone requires patience and the right approach. There are two primary methods: mechanical (manual) and chemical.
Manual Removal Techniques
This is the most common starting point and often sufficient for smaller jobs or accessible beads.
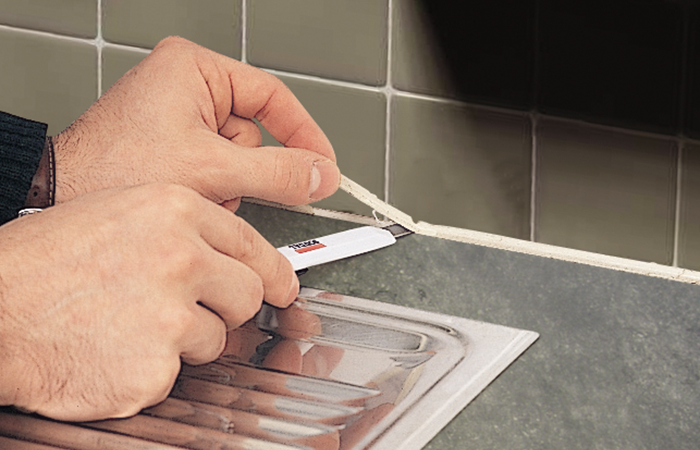
- Cutting: Use a sharp utility knife, razor blade scraper, or specialized silicone removal tool. Carefully slice along the top edge of the silicone bead where it meets the surface on both sides. Avoid digging into the substrate. For corners, use a sharp craft knife.
- Peeling & Pulling: Once the edges are cut, use needle-nose pliers, a hook tool, or your fingers (protected!) to grip an end of the silicone bead. Pull slowly and steadily, ideally parallel to the surface, aiming to remove the bead in one piece. If it breaks, grip a new section.
- Scraping: After the bulk is removed, use a plastic putty knife, a dedicated silicone scraper (often with different blade profiles), or a dull metal scraper (use extreme caution on delicate surfaces like acrylic or polished stone) to scrape away residual bits. Work gently to avoid scratches.
- Abrasion: For stubborn, thin residues, very fine steel wool (000 or 0000 grade) or a specialized abrasive pad (like Scotch-Brite) can be used gently on non-sensitive surfaces. Test in an inconspicuous area first.
Using Chemical Removers
Chemical silicone removers (solvents or dissolvers) soften the cured silicone, making it easier to scrape away. They are essential for large areas, stubborn residues, or silicone in porous surfaces like some stone where mechanical removal is difficult.
- Choose the Right Product: Select a remover specifically formulated for cured silicone sealant. Common active ingredients include solvents like d-Limonene or stronger chemicals like dimethyl adipate. Check compatibility with your surface material (test first!).
- Application: Apply the remover generously only to the silicone bead, avoiding surrounding surfaces as much as possible. Use a small brush for precision. Allow it to penetrate according to the manufacturer’s instructions (usually 15 minutes to several hours). The silicone should swell, soften, or become gel-like.
- Removal: Use a plastic scraper or putty knife to lift and scrape away the softened silicone. Wipe the residue with a clean cloth. Reapplication may be necessary for thick beads or deep penetration.
- Cleanup: Thoroughly clean the area with the cleaner recommended by the remover manufacturer (often isopropyl alcohol or soapy water) to remove all chemical residue before applying new sealant.
Tools and Equipment Needed
Gather these tools before starting:
- Sharp utility knives, razor blades, craft knives
- Silicone removal tools (hook tools, specialized scrapers)
- Needle-nose pliers
- Plastic putty knives/scrapers (various sizes)
- Dull metal scraper (use cautiously)
- Fine steel wool (000/0000) or abrasive pads
- Chemical silicone remover
- Small stiff-bristle brush (for applying remover)
- Clean rags or paper towels
- Protective gloves (nitrile or chemical-resistant)
- Safety glasses
- Mask (especially for chemical removers or sanding dust)
- Isopropyl alcohol or appropriate surface cleaner
- Painter’s tape (optional, to protect adjacent surfaces)
Tips for Successful Silicone Removal
Mastering how to remove silicone involves more than just technique; safety and best practices are paramount.
Safety Precautions
- Ventilation: Always work in a well-ventilated area, especially when using chemical removers which often have strong fumes. Open windows, use fans, or wear a respirator if necessary.
- Skin & Eye Protection: Wear chemical-resistant gloves (nitrile is often sufficient) and safety glasses to protect against splashes from removers and sharp tools. Avoid prolonged skin contact with removers.
- Sharp Tools: Handle knives, blades, and scrapers with extreme care. Always cut away from your body. Keep blades sharp – a dull blade requires more force and is more likely to slip.
- Surface Protection: Use painter’s tape to mask off adjacent surfaces, especially delicate ones like finished wood or polished metal, to prevent accidental scratches from tools or chemical drips.
- Read MSDS/SDS: Familiarize yourself with the safety data sheet for any chemical remover you use.
Best Practices for Effective Removal
- Surface Test: ALWAYS test your chosen removal method (especially chemicals and abrasives) on a small, inconspicuous area of the surface first to check for damage or discoloration.
- Patience is Key: Rushing leads to mistakes and surface damage. Allow chemical removers adequate time to work. Work methodically.
- Start Mechanical: Begin with careful cutting and peeling. Only move to chemicals or aggressive scraping if necessary.
- Sharp Tools: Use sharp blades for clean cuts. A sharp blade glides easier and offers more control, reducing the risk of gouging the substrate.
- Angle Matters: When scraping, hold the scraper at a low angle (almost parallel) to the surface to minimize the chance of digging in.
- Thorough Cleaning: After removal, meticulously clean the channel or surface with isopropyl alcohol or a recommended cleaner to remove all traces of silicone oil, remover residue, dust, and debris. This is critical for the adhesion of the new sealant. Wipe until a clean white cloth shows no residue.
- Surface Preparation: Before applying new sealant, ensure the surface is completely dry and free of any contaminants. Proper preparation ensures the new seal lasts.
Conclusion
Learning how to remove silicone is a valuable skill for maintaining the integrity and appearance of your home, vehicle, or project. While its durability makes removal challenging, a systematic approach combining the right tools, techniques, and safety measures makes the task manageable.