Table of Contents
A pristine, watertight bath is essential for both the aesthetics and structural integrity of your bathroom. Sealing the joints where your bath meets the walls and floor is a critical DIY task that prevents costly water damage. This guide provides a detailed, professional walkthrough on how to seal a bath effectively, ensuring long-lasting protection against leaks and mould.
Understanding the Importance of Sealing Your Bath
Water is incredibly adept at finding the smallest gaps. The junctions between your bath and the surrounding tiles or walls are prime entry points. Unsealed or poorly sealed baths allow water to seep behind tiles, under flooring, and into wall cavities. Over time, this moisture wreaks havoc, leading to:
- Structural Damage: Rotting wooden subfloors, joists, and wall studs.
- Mould and Mildew Growth: Unhealthy spores thrive in damp, dark spaces, causing respiratory issues and unpleasant odours.
- Damaged Finishes: Peeling paint, crumbling plaster, and de-laminating wall boards.
- Flooring Failure: Warped laminate, swollen chipboard, and loosened vinyl flooring.
- Costly Repairs: Remediating water damage is significantly more expensive than preventative sealing.
Benefits of Proper Sealing
- Waterproof Barrier: Creates an impenetrable seal against water intrusion.
- Prevents Mould & Mildew: Eliminates the damp environment mould needs to grow.
- Protects Structural Integrity: Safeguards subfloors, walls, and surrounding materials.
- Extends Bath and Tile Lifespan: Prevents deterioration caused by constant moisture exposure.
- Improved Hygiene: A smooth, sealed surface is easier to clean and less likely to harbour bacteria.
- Enhanced Aesthetics: Provides a neat, finished look to your bathroom.
Common Issues Caused by Improper Sealing
- Persistent black mould growth along bath edges.
- Softening or crumbling of walls/floors near the bath.
- Musty odours emanating from the bathroom.
- Visible water stains on ceilings or walls below the bathroom.
- Loose or lifting tiles adjacent to the bath.
- The sealant itself cracking, peeling, or turning mouldy prematurely.
Materials and Tools Needed for Sealing a Bath
Gathering the right materials before you start is crucial for a professional finish.
Types of Sealants
- 100% Silicone Sealant: The gold standard for bath sealing. Highly flexible, extremely water-resistant, and mould-resistant (especially with added biocides like “mould-free” formulations). Bonds well to non-porous surfaces like acrylic baths, ceramic tiles, and glass. Available in clear, white, and various colours. Essential for critical wet areas.
- Sanitary Silicone Sealant: Specifically formulated for bathrooms and kitchens with enhanced mould resistance. Often has additives to combat common bathroom microbes.
- Acrylic Sealant (Decorator’s Caulk): Water-based, paintable, and easier to apply/clean up than silicone. However, it’s less flexible, less waterproof, and significantly more prone to mould growth in constantly wet areas. Not recommended for sealing bath edges where constant water exposure occurs.
- Hybrid Polymer Sealants (e.g., Silane-Modified Polymers – SMP): Offer some benefits of both acrylic and silicone – paintable, good adhesion, flexibility, and moisture resistance. Check specific product suitability for bath sealing; some are excellent alternatives.
Essential Tools for the Job
- Caulking Gun: For smooth, controlled application of sealant cartridges.
- Utility Knife or Scissors: For cutting nozzle tip and trimming old sealant.
- Sealant Removal Tool (or Stanley Knife): For scraping out old, failing sealant.
- Methylated Spirits (Denatured Alcohol) or White Spirit: For final cleaning and degreasing surfaces (check compatibility with bath surface first! Test in an inconspicuous area).
- Masking Tape (Painter’s Tape): For achieving perfectly straight, clean lines.
- Bucket of Warm Water & Washing Up Liquid: For cleaning surfaces initially.
- Microfibre Cloths/Sponges: For cleaning and wiping.
- Nitrile Gloves: Protect hands from sealant and cleaning chemicals.
- Sealant Finishing Tool (or Finger/Damp Cloth): For smoothing the bead. Dedicated tools often give the best, most consistent result.
- Old Rags/Kitchen Roll: For general clean-up.
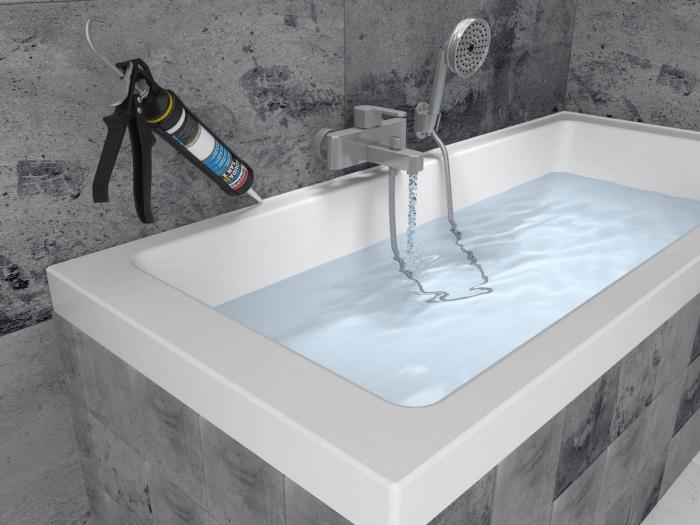
Step-by-Step Process on How to Seal a Bath
Follow these steps meticulously for a durable, professional seal.
Preparing the Bath Surface
- Remove Old Sealant: This is critical! Use a sharp utility knife or dedicated sealant remover tool to carefully cut and pry away ALL old silicone or caulk. Be gentle to avoid scratching the bath or tiles. Aim for completely clean, bare surfaces.
- Thorough Cleaning: Clean the entire area where the new sealant will adhere. Use warm water with washing-up liquid and a sponge to remove soap scum, dirt, and grease. Rinse well.
- Degrease: Wipe the cleaned joint (both bath surface and wall/tile surface) vigorously with methylated spirits or white spirit on a clean cloth. This removes invisible residues and ensures maximum adhesion. Allow to dry completely – this is non-negotiable. Any moisture will compromise the bond.
- Apply Masking Tape (Optional but Recommended): For crisp lines, run strips of masking tape along the edge of the bath and the wall/tile, leaving a gap of about 3-5mm where the sealant bead will go. Press down firmly.
Applying the Sealant
- Prepare the Cartridge: Cut the nozzle tip of the silicone cartridge at a 45-degree angle. The hole size determines the bead thickness – start smaller; you can always cut more off. Pierce the inner seal with a long nail/screw.
- Load Gun & Test: Insert the cartridge into the caulking gun. Test the flow on a piece of cardboard until it runs smoothly.
- Apply the Bead: Holding the gun at a consistent 45-degree angle, apply a continuous, steady bead of sealant into the joint. Apply firm, even pressure on the trigger. Move at a consistent speed – too fast creates a thin, weak bead; too slow creates a thick, messy one. Fill the entire joint from one end to the other without stopping. Ensure the sealant makes contact with both sides of the joint (bath and wall).
Finishing Touches and Drying Time
- Smooth the Bead: IMMEDIATELY after applying the bead, wet your finger (or a dedicated finishing tool) with a tiny amount of washing-up liquid diluted in water (prevents sticking). Gently run your finger/tool along the bead with firm, even pressure to smooth it, push it into the joint, and create a neat concave finish. Wipe excess sealant onto a rag. Work in manageable sections.
- Remove Masking Tape: Carefully peel away the masking tape before the sealant starts to skin over (usually within 5-15 minutes). Pull the tape back on itself at a 45-degree angle.
- Initial Curing: Avoid touching the sealant or getting it wet for the time specified by the manufacturer (usually 1-3 hours for skin-over).
- Full Curing: Allow the sealant to cure fully before using the bath. This typically takes 24-48 hours, but check the product instructions – some high-performance silicones can take up to 7 days for full strength and waterproofness. Keep the bathroom well-ventilated during curing.
Maintenance Tips for Long-Lasting Sealing
Protect your hard work and extend the life of the seal.
Regular Inspections
- Check the sealant around your bath every 3-6 months.
- Look for early signs of failure: discolouration (black mould), lifting edges, cracks, gaps, or areas that feel soft or spongy.
Cleaning and Care
- Clean the sealed area regularly with mild bathroom cleaners or a vinegar/water solution. Avoid harsh abrasive cleaners or scouring pads directly on the sealant.
- Wipe down the bath and surround after each use to prevent excessive soap scum and moisture buildup.
- Never use bleach-based cleaners directly on silicone, as they can degrade the material over time.
Troubleshooting Common Problems
Even the best seal can face issues.
Addressing Sealant Cracks
- Small Cracks/Gaps: Clean and dry the area thoroughly. Apply a thin bead of fresh sealant directly into the crack, smooth, and allow to cure.
- Large Cracks/Extensive Failure: The safest and most effective solution is to completely remove the old, failed sealant (following the preparation steps above) and reapply a full new bead. Patching rarely lasts long in wet areas.
When to Reapply Sealant
- Visible Mould Penetration: If mould is growing under the sealant or deep within it.
- Significant Lifting or Detachment: When the sealant is no longer adhered to the bath or wall along a section.
- Multiple Cracks or Hardening: Sealant that has become brittle and cracked.
- As Preventative Maintenance: Even if it looks okay, consider proactively resealing every 3-5 years, especially in high-use bathrooms.
Conclusion: Final Thoughts on How to Seal a Bath Effectively
Knowing how to seal a bath is an essential DIY skill for any homeowner. It’s a relatively simple and inexpensive task that prevents disproportionately expensive and disruptive water damage. By investing time in meticulous preparation, using the right materials (specifically high-quality silicone), applying the sealant carefully, and performing regular maintenance, you create a robust waterproof barrier. This protects your bathroom’s structure, promotes a healthier environment free from mould, and keeps your bath looking its best for years to come. Mastering how to seal a bath effectively provides significant peace of mind and protects one of your home’s most important investments.