Table of Contents
The Problem of Carpet Slippage: Causes, Risks, and Solutions
Carpet slippage is a common issue in both residential and commercial spaces, often leading to safety hazards, aesthetic disruption, and premature floor damage. Whether you have hardwood, tile, laminate, or vinyl flooring, an unsecured rug or carpet can become a persistent problem—especially in high-traffic areas or homes with children and elderly individuals.
Understanding how to stop carpet slipping is essential for maintaining a safe and polished environment. This guide offers expert advice, proven methods, and preventative measures to eliminate carpet movement and ensure lasting floor stability.
Understanding Why Carpets Slip
Several underlying factors contribute to carpet movement. Identifying these causes allows for more effective solutions:
1. Smooth Flooring Surfaces
Hardwood, tile, and laminate floors provide little friction, making rugs more susceptible to sliding—especially when stepped on or subjected to frequent foot traffic.
2. Absence of a Non-Slip Base
Rugs placed directly on hard flooring without an underlay or grip pad lack the traction needed to stay in place.
3. Lightweight or Inappropriately Sized Rugs
Smaller or thinner rugs tend to shift more easily, particularly in open or high-use spaces like living rooms and hallways.
4. Movement from Furniture
Furniture that is frequently adjusted or walked around may displace nearby carpets over time.
How to Stop Carpet Slipping: Practical DIY Solutions
Implementing do-it-yourself methods can be a highly effective and cost-efficient way to reduce or eliminate carpet movement. Below are several proven strategies:
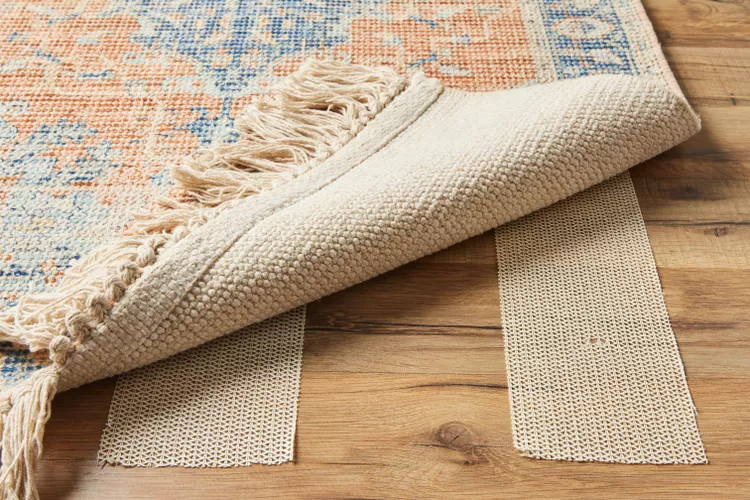
1. Install a High-Quality Non-Slip Rug Pad
Non-slip rug pads are among the most recommended solutions for stabilizing rugs. Made from materials like rubber or felt, these pads provide additional grip by creating friction between the carpet and the floor.
- Application: Cut the pad to fit slightly smaller than the rug and place it directly underneath.
- Compatibility: Ideal for hardwood, tile, laminate, and vinyl surfaces.
2. Use Double-Sided Carpet Tape
Double-sided carpet tape is a quick and convenient method for adhering rugs to flooring.
- Application: Apply the tape around the perimeter and press the rug firmly into place.
- Caution: Be mindful of potential adhesive residue, especially on delicate surfaces. Choose floor-safe tape varieties.
3. Apply Silicone Caulk to the Rug Underside
For smaller area rugs, a line of silicone caulk along the back can serve as a non-slip grip.
- Application: Apply zigzag patterns with clear silicone, let it dry completely, and then place the rug down.
- Advantage: Discreet and low-cost with long-term results.
4. Use Velcro (Hook-and-Loop Fasteners)
Velcro strips are a reliable option for small rugs that require firm placement.
- Application: Attach one side of the fastener to the floor and the other to the rug.
- Suitability: Effective for high-traffic or frequently accessed areas.
Professional Solutions for Enhanced Stability
While DIY methods work well in many cases, professional-grade solutions may be necessary for larger rugs, commercial environments, or homeowners seeking long-term reliability.
1. Invest in Commercial Rug Grippers
Commercial rug grippers feature advanced materials and mechanical grip systems that secure rugs even in high-traffic spaces.
- Installation: Typically involves adhesive strips or pressure-sensitive backing.
2. Engage a Flooring Specialist for Underlay Installation
For larger rugs or fitted carpets, consider hiring a flooring expert to install a custom non-slip underlay.
- Advantages: Provides tailored coverage, superior grip, and long-term stability.
- Use Case: Recommended for expansive areas such as open-plan living spaces or hallways.
3. Apply Professional Spray Adhesives
Specialized rug adhesives are designed for temporary or semi-permanent bonding between carpets and various flooring types.
- Precaution: Always confirm product compatibility with your specific floor material to avoid damage or staining.
Preventative Measures to Maintain Carpet Placement
Taking proactive steps to minimize future rug slippage can protect your flooring and reduce maintenance needs:
1. Choose the Right Rug Material and Weight
Opt for heavier, high-pile rugs such as wool blends, which naturally resist shifting more effectively than lightweight synthetic options.
2. Match Rug Size to Room Dimensions
A rug that is proportionate to the space it occupies is less likely to move. Ensure coverage under key furniture pieces to anchor it further.
3. Position Furniture Strategically
Placing furniture legs over rug edges helps secure placement and reduces the likelihood of movement from daily activity.
4. Maintain a Clean Surface
Dirt and dust between the rug and floor can reduce friction. Regular cleaning underneath both the rug and pad improves performance and hygiene.
Safety Considerations for a Slip-Free Environment
Loose or wrinkled rugs present a genuine hazard, especially in homes with elderly residents, small children, or individuals with mobility issues. Take the following precautions:
- Conduct a Stability Check: After installing a non-slip solution, walk across the rug to ensure there is no movement.
- Secure Curling Corners: Use corner grippers or weights to prevent edges from lifting and creating trip hazards.
- Avoid Hazardous Materials: Use non-toxic adhesives and check for allergen-free certifications if pets or sensitive individuals are present.
Conclusion: Achieving Long-Term Rug Stability
Carpet slipping may seem like a minor inconvenience, but it poses significant safety and aesthetic issues when left unaddressed. Whether you choose a basic DIY fix or invest in a more advanced professional solution, understanding how to stop carpet slipping is key to creating a safer, more polished living space.
From non-slip rug pads and adhesive tapes to customized underlays and furniture anchoring, the methods outlined in this guide cater to a wide range of flooring types and interior settings. By taking a proactive approach, you can extend the life of your carpets, protect your floors, and ensure a secure environment for everyone in your home.